Scan Day Protocol / MRI Visits (work in progress)
The scan protocol is available here and the EXAR file is here
MRI Visit
EF Consents
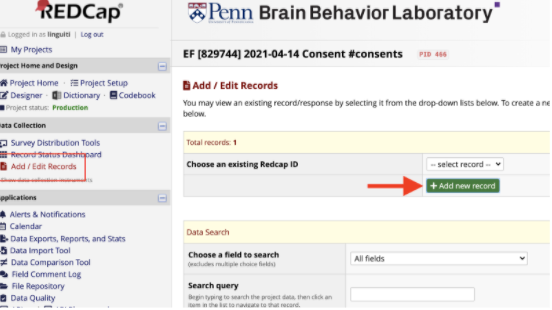
- As of Jan, 2021 all consents have been made virtual. Navigate to https://axis.med.upenn.edu/ and select “EF [829744] Consents #consents” Project (may be updated naming due to updates/modifications to consent form)
-
Select “Add/Edit Records” from the left side and then select green “Add New Record”
-
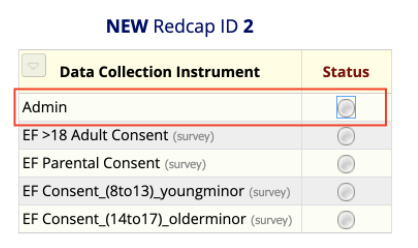
Next, select “Admin” and fill out all necessary fields. Mark “Form Status” as “Complete” and hit save and go to next form. This will automatically generate the correct forms based on the indicated DOB of participant.
-
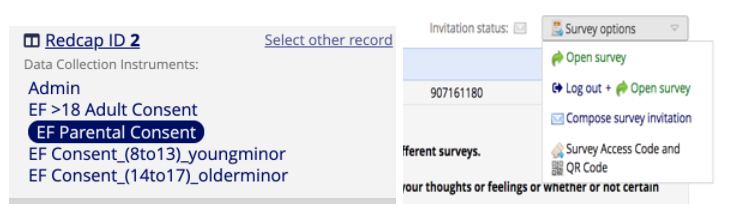
To open, select the form on the left side panel and same as above, on Scales Instructions, select “Open Survey” on the top left of the screen.
- After completing the consents, there will be a green circle on the left indicating it was completed. IMPORTANT: after completion, always download the forms following these steps:
- Click to the “Admin” page on the left-side, click “Download PDF of instrument” then select “All Forms/Surveys with saved data (compact)” then save this PDF to the folder on Saturn (afp://Coordinators/Protocols/TED_PROTOCOLS/EXECUTIVE_829744/VIRTUAL EF ASSESSMENTS/CONSENTS/)
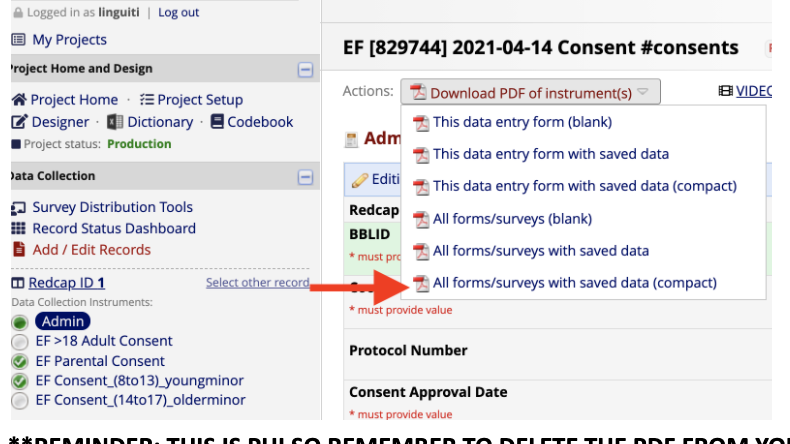
- Click to the “Admin” page on the left-side, click “Download PDF of instrument” then select “All Forms/Surveys with saved data (compact)” then save this PDF to the folder on Saturn (afp://Coordinators/Protocols/TED_PROTOCOLS/EXECUTIVE_829744/VIRTUAL EF ASSESSMENTS/CONSENTS/)
REMINDER: THIS IS PHI SO REMEMBER TO DELETE THE PDF FROM YOUR DOWNLOADS FOLDER
Preliminary Scan Day Procedures (to be completed right after consents)
Demographics:
(Can do these at any time throughout the visit. Complete Demos alone with parent (see Sage Rush for SES Section Training)
- On oracle, select “Study Enroll” on the left-side panel → select “Demos Store” and enter the BBL
- Note: If they were not already enrolled during CAPA, then select “Study Enroll” and enroll them using the date they signed the consent form, when completed you will be automatically sent to the demographics page
- Note: There should be a demographics update at each interaction with participant (both CAPA and scan day)
Medications:
- On Oracle, select “Medication” on the left-side panel → select “NewCollect MedStore” and enter the BBL → select “Do medication entry”. – enter the corresponding information, visit #= the timepoint you are collecting for
- Note: Will need exact dates of start/completion of medication
Metal Screener: (procedure as of April, 2021—subject to change)
- Print paper screener which can be found here: afp://Saturn/Coordinators/Protocols/TED_PROTOCOLS/EXECUTIVE_829744/subjectFolder/mri/ Generic_MRI_metal_screen_UPDATE
- Ask parent to complete the form and sign NOTE: when you get down to the scanner have MRI Technologist review the form and sign at the bottom
Computerized Neurocognitive Battery (CNB)
Refer to Lisa D’Errico for specific directions on administration of CNB’s (in person or remote) Note: for timepoint 1 you will be completing LiBI CNB on CAPA-day and only EXECTS CNB on scan-day. For T2/T3 you will complete BOTH LiBI and EXECTS
EF-Specific Set-Up
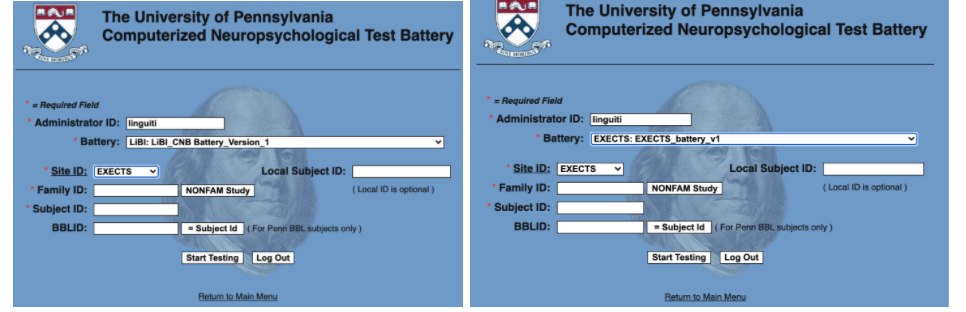
- Timepoint 1: Administer the EXECTS CNB with EXECTS site ID. Full LiBI CNB is administered on intake day under LiBI site ID. BBLID = SUBID.
- Timepoint 2/3: Administer EXECTS CNB with EXECTS site ID, and LIBI CNB with EXECTS site ID.
- For in-person assessments, navigate to https://webcnp.med.upenn.edu/ then select “Administer WebCNP Battery” and you will be prompted to sign in
- For virtual assessments, refer to the guides and site-mapping specs in the Coordinators channel. The LiBI battery on T2 can be administered virtually, but the EF CNB must always be administered in person.
- Fill in the remaining fields as well as the following page which asks about DOB, education, sex, handedness
Reminder: as per CNB training remember to go back to “validate session” and fill in any notes on the assessment
Variability
- On the EF laptop, (user: Field Coordinator, password: common password using C), go to the IIV battery folder on the desktop
- Go to log_files and create a new folder outside “TIMEPOINT1” and “TIMEPOINT2”: labeled “BBLID_SCANID” for both T1/T2/T3 (note: T1 used to be labeled only BBLID, however, this later changed and all logfiles created are now labeled BBLID_SCANID)
- Attach the EF console to the computer via the wire
- Click on the presentation file for the IIV battery, next select “Scenario” tab. In the sidebar, navigate to the folder you just created, and click the “«” button to populate the correct folder (this ensures data will be saved in this folder)
- Then go back to the main menu, click “Continue”, and enter BLID_SCANID for T1/T2/T3
- Next DEselect, “CPT_gordon”, “simple_processing”, and “complex_processing”. – The only tasks selected which WILL BE administered are “Dominant”, “Reaction”, “CPT”, and “complex_reasoning”. Next, hit “run non-stop.”
- “Ready…” will appear on the screen, press “enter” to continue. Read instructions and run through task. The next task should start automatically (if it does not- select “continue” and “run non-stop”) When the next task begins you will see “Ready…” again, press “enter” and run through all tasks.
- When all tasks are completed, select “Finish” and click the “X” at the top corner of the program. Select “Save Experiment.”
- Log into PennBox (or the Box with your PennKey), and move the log_file into timepoint1/2/3 under the Variability tasks. Also move the log file into the correct folder on the EF laptop, i.e: TIMEPOINT1 or TIMEPOINT2
- Troubleshooting: [in case of error]
- Disconnect and reconnect the variability apparatus and start again
- Make sure the log file is not within the “TIMEPOINT 1” or “TIMEPOINT 2” folders
- David Roalf is a good contact person if you need more help troubleshooting
Self-Report Questionnaire Administration
Note: Both child and parent will be completing self report questionnaires. The proband scales are 3 surveys, the child will be more depending on the timepoint how many. If participant is >18y/o no proband scales will be completed.
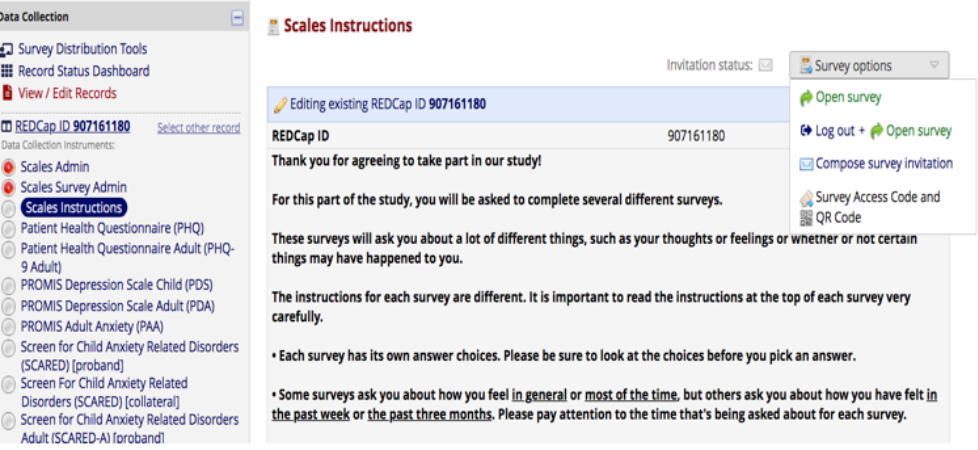
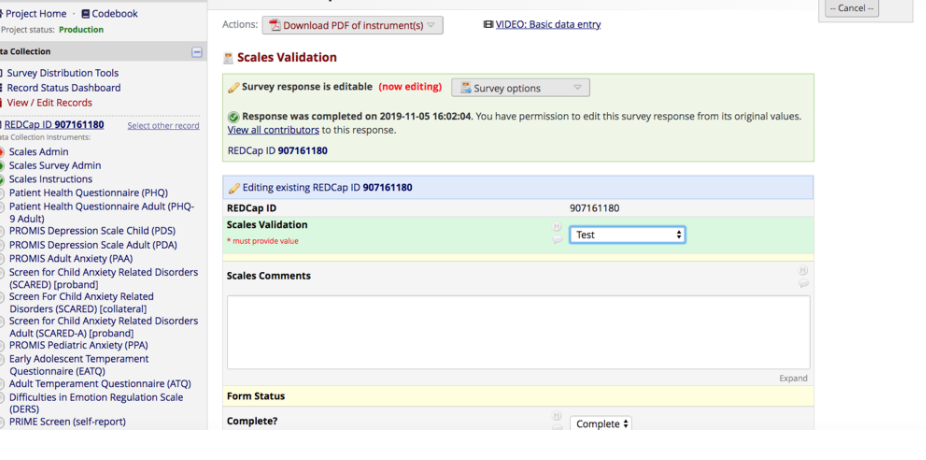
- Navigate to RedCap at the link here, sign in with your RedCap credentials and select project titled: “Common Self Report Scales #collection”
- Click “Add/Edit Records” on the left side panel and enter the BBL ID and select the scales with the Redcap ID that you generated through oracle
-
Fill out the Scales Admin page and click save and go to next form. On Scales Instructions, select “logout + Open Survey” on the top left of the screen (screenshot below) and you will review instructions verbatim with participants. (see additional notes on how to administer below)
-
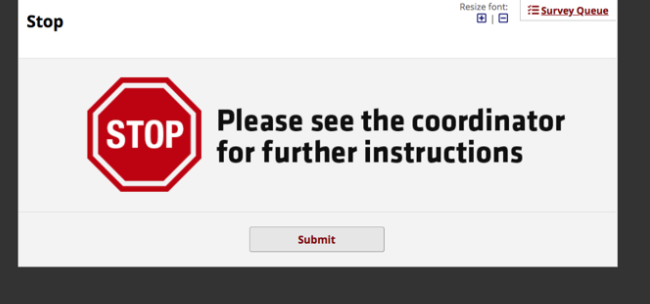
If participants don’t have any questions, you can click “submit” and the participant will move through the self-report scales, survey to survey until they are finished. Then they will get the below screen.
-
You will then need to enter a validation code. Please also enter any notes fields you see fit. If you select any validation code other than “valid”, you must include notes as to what led to your selection.
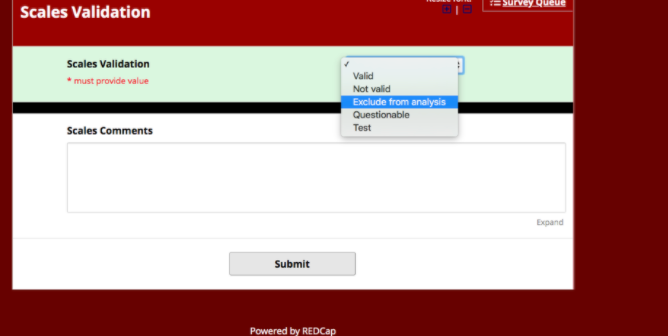
- If you click past this (or the participant does) you are able to enter the validation code “offline” as well by going into the record at a later time and clicking into the form “Scales Validation”.
Miscellaneous but important notes:
- During instructions page, please reiterate to the participant that they should try to answer each question and take their best guess if they’re unsure, and that they are able to skip any questions they do not feel comfortable answering.
- Don’t forget to give collateral the 3 short questionnaires to fill out about the proband, preferably during a time when they are not with the proband
- Remind participant to ask the coordinator if they have any questions about any of the questionnaires or items.
- For participants under the age of 18, we stay in the room so we’re close by for questions. For very young children (e.g., younger than 10) you will likely want to proctor the scales administration (i.e., read each question aloud - specify that in the notes section). For older participants (i.e., 18 and older) it’s OK to tell the participant you’ll wait outside and are nearby if they have questions.
- You should make a REDCap report so you can follow along when the forms are marked as complete (please reach out to the CRM so they can show you how to create this if one is not already created). This is to ensure 1) they are moving along and not stuck 2) that they are attentively answering questions and not distracted3) they’re not just clicking the same answer over and over just to get it done.
Pre-Scan Items
- Practice task: [duration = 3-5 min.]:
- Using the EF small black HP laptop, go through the practice N-Back task that they will encounter during the scan Note: This must be completed prior to the scan
- EF Black PC Laptop → enter common password → click on EFR01 (the presentation) on the desktop → Click run scenario or run non-stop
- You will see a page that says “Ready” – Press enter to continue
- The instructions for the 0-Back will appear → read the instructions below, press the Space Bar to continue to 2-back → After you have completed giving the instructions press “ESC” → “Continue” → “Run non-stop” to begin the task Instructions: “This is the n-back fractal task that you will play during the scan. In the scanner, you will have a screen that shows the task and a remote that you will hold in your dominant hand throughout the scan. In the actual scan, you will press the left blue button to respond, for right now, we will practice with you pressing the ‘B’ button on the computer keyboard. The test has two parts, we’ll practice both parts. The first part is the 0-back. Press the “B” button as fast as you can whenever you see this purple picture (point to picture). Do you have any questions about the 0-back? Great! The second part is the 2-back, press the “B” button as fast as you can whenever the picture you see is the same as the one that came two before, or two-back. You can see in this example, there is the fire picture, stripped picture, then the fire picture again. You’d press the button when you see the last fire picture because it’s the same as the one that came two before or two back (pointing throughout). Any questions before we begin the practice? Great!” Observe practice to ensure they understand. Repeat if they do not seem to understand.
- Radiology Check-In: [duration = 10-20 min.]
- 20-30 minutes before the scheduled scan time escort participant and collateral to radiology for them to be checked in (good time for participant to use the bathroom at radiology) Note: Parent/legal guardian is needed to sign necessary consent information at Radiology
- Pre-Scan Self Reports: [duration = 5 min.]
- On RedCAP, the second set of self-reports generated from oracle will have 2 short surveys to be completed either at HUP6 or right before you go down to radiology (see notes above on axis self-report generation and administration)
Instructions: The first survey is about how you feel right now, in this moment, about to get in the scanner. Fill in the bubbles and press submit when you are finished. This will take you to a second survey. When finished, hit submit and tell me you’re done.
Scan
Prescan setup ~10 minutes
- PROTOCOL NAME: SATTERTHWAITE→ “ABCD_32Channel”
- FLYWHEEL: BBLID_SCANID@BBL:EFR01
- In case of glasses: use the tool-kit to fix participant with MRI safe glasses
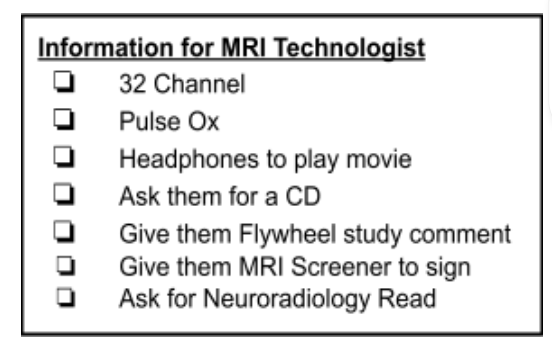
- Information for MRI Tech:
- Log into BBL Computer Account: Presentation Password: common password
Set up 2-button response device
- Plug in FORP into BBL_computer
- Press button once to change mode
- Turn dial to ‘yes’ and press down knob to select
- Select “000” and press down knob to select as below:
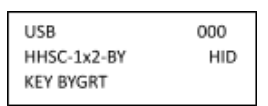
- Open notepad on BBL computer to test response device
- Plug in 2-button response device to scanner and press the blue button a few times to test, should see “bybbb” (or some combination) come up on notepad, that means it’s working
Set up frac bac task
- Select “EFR01” folder on desktop → select “Subject Files” → select either TIMEPOINT 1 or 2 and create a new folder
- File naming: folder name = BBLID_SCANID (note, at T1 folders used to be titled only “BBLID” but now files at all timepoints are labeled BBLID_SCANID)
- Go back to EFR01 folder → select “EFR01_Task” → BBLID_SCANID then select “run”
- Click “EFR01 Task”, select “Scenarios” → on right side, scroll down and select the logfile you just created and hit the “→ ” arrow so that the name of the folder populates at the end of the file path
- Go back to the administration, deselect the first (crosshair) and the last task and make surer the “f2b instructions” is highlighted. Next, enter BBLID_SCANID when it asks you the name of the experiment– this is now set up and ready to be run during the frac_back sequence
- Log into Shared Computer Account: meduser
Set up Movie
- Select “EFR01_SubjectFilms” from desktop on shared computer, select movie - or DisneyPlus for Ratatouille
- Make sure the long AUX chord is plugged into the shared computer
- Power on white connector, (volume=50) and select “reverse L/R”
- Set up Crosshair Powerpoint
- Select “Crosshairs” from desktop of shared computer, minimize until needed
- Make sure the long AUX chord is plugged into the shared computer
Ensure participant is set up comfortably
- Make sure to remind them to stay very still and keep the 2-button remote in their dominant hand the entire time. Make sure they feel the left blue button which they will be using.
- Tell them you will be right outside and will talk to them every few minutes (gage nervousness)
Scan administration ~57 minutes
- Reminder: Sign in to MRI apt on CAMRIS calendarhttps://pathbio.med.upenn.edu/camris/dogfish/
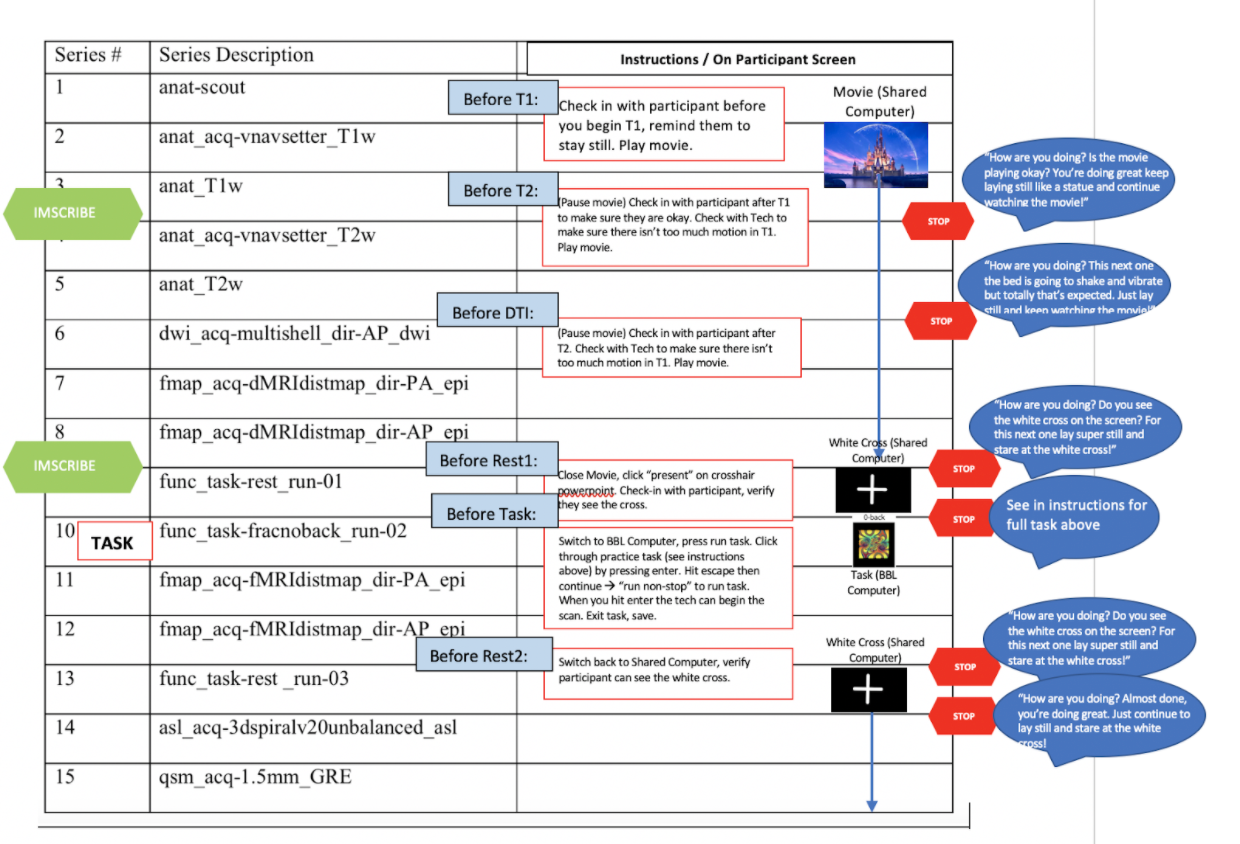
- Before T1 navsetter (Series #2 - anat_acq-vnavsetter_T1w) check-in with participant to make sure they are ready and the movie is playing okay – remind them to stay super still – play movie
- Immediately following the end of T1 (Series #3 - anat_T1) RUN IMSCRIBE (must be completed before Series #6 - DWI) and give IMSCRIBE results to the technologist (see notes on how-to complete IMSCRIBE below):
- You can then run the next IMSCRIBE immediately changing the template – needed before first functional task (series #9)
- Before T2 navsetter (Series #4 - anat_acq-vnavsetter_T2w) pause the movie and check in with participant again, also ask the technologist if there is motion on T1, if yes, repeat T1 and re-run inscribe
- Following T2 ask Tech to make sure there is not too much motion - if there is, repeat it.
- Before DWI (Series #6 - dwi_acq-multishell_dir-AP_dwi) pause the movie and check in with participant. Remind them this is the part where the bed will shake/vibrate but to remain as still as possible and continue to watch the movie
- Following DWI confirm that there wasn’t too much motion on DWI, if yes, repeat
- Before the first functional task (Series #9 - func_task-rest_run-01) pull up the white cross on the far left computer and confirm with participant that they see the cross, tell them to focus on the cross and stay super still
- Before the frac-back task (Series #10 - func_task_fracnoback_run-02) Switch to the BBL Computer and press “run task.” Click through the instructions using the space bar and confirming participant remembers/understands the instructions. Next, press esc - continue - then “run non-stop” to begin
- You will see a black screen - tell the technologist they can begin, and a fractal will appear
- You can track to make sure participant is responding looking at the FORP dashboard - when they select a button a light will appear there
- Click continue - exit task - save to save the logfiles from the task
- Before the 3rd functional task (Series #13 - func_task-rest_run-03) switch back to the Shared Computer and pull up the cross - ensure that the participant can see the cross and begin
- You may check in between ASL and QSM (series 14/15) as needed - cross remains on the scree Notes on Scanner Motion: Scans are in the order or importance, prioritize repeating T1 and T2 scans if there is motion - even if this means having to cut ASL/QSM at the end
Imscribe
- Complete at the end of T1)
- Right click on desktop and open terminal, type “matlab” in terminal
- In matlab, type “imscribe” to launch
- First Imscribe: apply to DTI
- Template localizer →T1 (make sure to click “show all files”)
- Template FOV → DTI
- Target localizer→ latest RT export (if right after T1) OR: mnt → → RTExport_Current → click “name” once to make it sort by the most recent (?) → click the particpants name → select 176 images from “series 4”
- Note: if sequences run in different order or sequence repeated, the series number will no longer be 4 and will be different. Key is to look for the 176 images
- Second Imscribe after T1: apply to Rest_Bold, FracBack, other Rest_Bold
- Template localizer→ stays the same as above
- Template FOV→ BOLD
- Select “reuse xForm” on the top right to re-use the T1 scans from above
MRI Cleanup
- Sign out of CAMRIS calendar
- Collect frac_back logfiles (2 files) from BBL_computer by uploading to Pennbox
- Ensure data has appeared on Flywheel
- Sign out/close all windows used on computer
- Remind Technologist about CD/neuroradiology read
GRAB CD from previous visit if you have not already
Final Visit Procedures
- Post-Scan Self Reports: Completed post-scan self reports on Axis (one survey about how they feel right then in that moment) immediately following the scan
- W9/C2: Make sure participant signs W9 and C2, and participant rather than parent writes the name
- Payments: Give participant the Clincard https://clincard.com/ and load payment ($100 for EFT1, $150 for T2, $150 + $150 BONUS at T3) Escort the participant back to the main lobby, thank them!! and remind them to send you pictures of receipts for travel (must have total amount and the date)