Gear Development on Flywheel
A Guide to Developing & Maintaining Gears on Flywheel
Slide show presented by Tinashe M. Tapera at Data Club February 12 2020
Itinerary
- What are gears?
- Why would we need gears?
- How to build a gear?
- How to maintain a gear?
What are Gears?
“Flywheel offers a library of ready-to-use pre-processing and pipeline applications to help you speed deployment of your projects — We call them Gears.”
Gears are just code, wrapped up, packaged, version controlled, and ready to run on the Flywheel system.
Gears are run by Google virtual machines. In addition to storing our data on the cloud, we, the users, pay Flywheel engineers to configure and manage the running of our code on Google VMs. This frees us from having to concern ourselves too much with the software engineering side of large scale data warehousing. The process goes like this:
- Flywheel creates a template for a virtual machine with certain configurations (disk space, CPUs, etc.) and shares this template with us
- We write code that able to do stuff in that kind of template;
- We package that code so that Flywheel can plug it in to their GUI;
- We point Flywheel to where they can download and access the code;
- When someone uses Flywheel’s GUI to run our code, Flywheel “spins up” a virtual machine from Google, sets up our code and the filesystem, pulls down the data, and runs our code as we specified
- Once the code has finished running, Flywheel gathers metrics from the Virtual Machine before shutting it down; they grab everything in the
outputsdirectory and send these items to an Analysis object, which is attached to the session the gear started from.


In general, gears are made up of:
- Your data from Flywheel on a VM
- An API
- An SDK
- A Container, holding a minimum of 3 files: a dockerfile, a manifest, and a run script
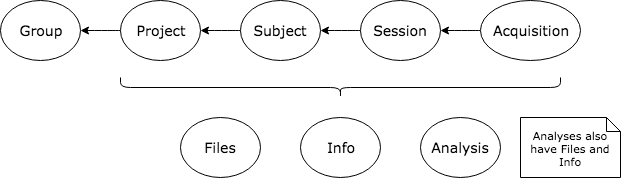
Flywheel Data Model
Remember that data in Flywheel is represented by objects. These objects are hierarchical in nature (A subject can have one or many sessions but an acquisition cannot have a subject), and have associated information fields (key: value pairs), file attachments (e.g. the nifti image) and analysis attachments (which are generated by gear runs).

APIs, SDKs?
API: Application programming interface
CLI: Command-line interface
SDK: Software Development Kit
Think of an API as a Rosetta stone, a tablet by which two vastly different languages, two different instruction sets, can be translated and transferred for mutual understanding.
An SDK is a set of tools, libraries, relevant documentation, code samples, processes, and or guides that allow developers to create software applications on a specific platform; SDK’s are sometimes wrappers around CLI’s.


Containers?
A container encapsulates all the software dependencies required for your code to work. This includes special packages (tidyverse, numpy), programming language versions (python 2.7 vs python 3.7) — all the way down to the OS and kernel (linux or ubuntu).
Using containerisation, “will this run on their machine” is a question you will rarely have to ask.


Why Would We Need Gears?
The biggest arguments for using gears are:
- Reproducibility — you can be sure that with the same gear, you will always be able to reproduce an output, which makes for better science!
- Version control — since gears are built using code, you can take advantage of version controlling to organise and track your experiments
- Provenance — Flywheel takes care of most of the above for you, by closely following and tracking each gear you run as well as the configurations and conditions that the gear ran under (metadata)

How to Build a Gear
Next, we will learn how to build a simple gear. Make sure to start this in its own isolated directory (e.g. TutorialGear)
Gears are run natively using Docker, which handles all of the containerisation discussed earlier. See this resource on how to download Docker to your machine and get an account.
Along with Docker, you will also need to install and log in to the Flywheel CLI; you can find out how to do that here.
Flywheel VM Environment Anatomy
The VM Flywheel spins up for us has a file system that looks like this:
/flywheel/v0/
     ├── input/
     ├── output/
      └── config.json
When you specify input data, it will be found in the input directory. Any outputs you want to save, should be placed in the output directory. The config.json file is ajson file (key:value pairs) that is generated by your manifest. We’ll get to that soon.
Manifest
The manifest is going to provide Flywheel with all the information it needs to run the gear. This includes metadata such as the gear’s author, the gear version, any runtime environment variables, and so on. It also includes any inputs and configuration settings, which the user will have a chance to enter and modify when the gear is run in the Flywheel UI. It’s written in json format. These will almost always be necessary fields so feel free to copy-paste the following and edit as necessary.
Manifest metadata
This is a top level section in the json and tells Flywheel all it needs to know about storing and running the gear, e.g. name, description, version, etc., as well as the location of the docker image repository the code lives in:
"name": "tutorialgear",
"label": "Gear Building Tutorial",
"description": "Test out how to build a gear",
"version": "0.0.1_0.0.1",
"command": "./run.py",
"author": "New Gear Builder",
"maintainer": "New Gear Builder",
"cite": "",
"license": "BSD-3-Clause",
"source": "",
"url": "",
"custom": {
    "gear-builder": {
        "category": "analysis",
        "image": "pennbbl/tutorialgear:0.0.1_0.0.1"
    },
    "flywheel":{"suite": "PennBBL"}
}
Manifest Config
The manifest’s config level represents any input settings that are not files, such as options or text input:
"config": {

    "foobar": {
        "default": true,
        "description": "Use foobar in this gear",
        "type": "boolean"
    }
}
Manifest Inputs
The manifest’s input level represents any input data from files:
"inputs": {
    "api-key": {
        "base": "api-key"
    },
    "infile": {
        "base": "file",
        "description": "A random input file",
        "optional": false
    }
}
The final product, manifest.json, looks like this:
{
    "name": "tutorialgear",
    "label": "Gear Building Tutorial",
    "description": "Test out how to build a gear",
    "version": "0.0.1_0.0.1",
    "command": "./run.py",
    "author": "New Gear Builder",
    "maintainer": "New Gear Builder",
    "cite": "",
    "license": "BSD-3-Clause",
    "source": "",
    "url": "",
    "custom": {
        "gear-builder": {
            "category": "analysis",
            "image": "pennbbl/tutorialgear:0.0.1_0.0.1"
        },
        "flywheel":{"suite": "PennBBL"}
    },
    "inputs": {
        "api-key": {
            "base": "api-key"
        },
        "infile": {
            "base": "file",
            "description": "A random input file",
            "optional": false
        }
    },

    "config": {

        "foobar": {
            "default": true,
            "description": "Use foobar in this gear",
            "type": "boolean"
        }
    }

}
Run script
Here’s the code you actually want to execute. It could do anything you want, from complex analysis pipelines to printing to stdout. In this case, we’re just going to look at the config options, list files in the environment, and write a file to output.
Following is a simple python script; you can learn about programming with the SDK here.
Note here the use of the GearContext function. This returns a dictionary that you can manipulate to access object IDs and configuration. The documentation for this is available here; we may want to provide a separate walk through of GearContext once we’ve fully figured it out.
The final product, run.py, looks like this:
#!/usr/bin/env python

import os
import flywheel

# from the gear context, get the config settings
context = flywheel.GearContext()
config = context.config

# log in to flywheel
fw = context.client

# find the analysis object this belongs to
## THIS DOES NOT WORK WHEN TESTING LOCALLY

analysis_id = context.destination['id']

# Some gymnastics
analysis_container = fw.get(analysis_id)
project_container = fw.get(analysis_container.parents['project'])
session_container = fw.get(analysis_container.parent['id'])
subject_container = fw.get(session_container.parents['subject'])

me = ' '.join([fw.get_current_user()['firstname'], fw.get_current_user()['lastname']])
output_string = "This is a gear run by " + me

output_string = output_string + '''
Project: {}
Subject: {}
Session: {}
'''.format(project_container.label, subject_container.label, session_container.label)

# we can print to the gear log
print("Config:\n", config)
print("Inputs:\n", os.listdir("/flywheel/v0/input"))

# we can also write files
f = open("/flywheel/v0/output/out.txt","w+")

f.write(output_string)
f.close()
The dockerfile
In your text editor of choice, create a dockerfile. This dockerfile tells docker how to build its image. When this image is run, it becomes a container.
Creating the Dockerfile will by nature include some (or all) of the following steps:
- Select the OS
- Install any additional packages necessary
- Set environment variables
- Copy in any necessary files/folders for the program to run
- Set an entrypoint
Dockerfiles do follow a certain language with reserved words for commands. There’s not much that we need to know about that here, but you can learn more at this resource.
OS
Fortunately, you don’t need to know how to build an OS. You can simply pull an image of one from someone else who’s already done that for you, from a repository called DockerHub. Here, since we’re building a python gear, we’ll just pull a basic python image:
FROM python:3.7
Packages
Of course, to interact with flywheel, we will need the flywheel sdk. To get this, we use the RUN command to give a specific instruction to the OS:
RUN python3 -m pip install --upgrade pip
RUN pip install --no-cache flywheel-sdk
Environment Variables
We can set environment variables with ENV:
ENV FLYWHEEL /flywheel/v0
RUN mkdir -p ${FLYWHEEL}
Copying Files
Copy the code you want to run into the docker image and remember to set permissions:
COPY run.py ${FLYWHEEL}/run.py
RUN chmod +x ${FLYWHEEL}/*
Entrypoint
An entrypoint is the standard command you want docker to run when it runs the image and creates a container out of it. For example, if you wanted to run a docker container interactively at your command line, your entrypoint might just be bash, i.e. “start this container and give me a bash shell.”
In this case, we want it to simply run our python script and exit:
ENTRYPOINT ["python run.py"]
The final product, dockerfile, looks like this:
FROM python:3.7

RUN python3 -m pip install --upgrade pip
RUN pip install --no-cache flywheel-sdk

ENV FLYWHEEL /flywheel/v0
RUN mkdir -p ${FLYWHEEL}

COPY run.py ${FLYWHEEL}/run.py
RUN chmod +x ${FLYWHEEL}/*

WORKDIR /flywheel/v0

ENTRYPOINT ["run.py"]
With these 3 files present, it’s time to build the docker image that Flywheel will use to run your gear!
Building Images
User docker build -t <dockerhub_Accountname>/<gear_name>:<gear_tag> . to build the image. Then, upload it to docker hub with docker push <dockerhub_Accountname>/<gear_name>:<gear_tag> .. This allows Flywheel to grab that image from the internet whenever it’s asked to run your gear.
Building docker images is a slow process but is well worth the investment in time. See this guide for more.
Testing
To test your gear, you can use the command fw gear local. It will spin up the container and run the entrypoint command as though it were on the virtual machine. You can use it like a command line tool:
$ fw gear local --help

Run your gear from the current folder

Usage:
  fw gear local [flags]

Flags:
      --foobar          Use foobar in this gear (default true)
  -h, --help            help for local
      --infile string   A random input file
This bit is tricky, but is useful in some cases. You’d need to have the files you want the gear to run on, locally available (?!), and additionally, the GearContext is not entirely useful; specifically, if you did GearContext(), then context.destination['id'], the local test would fail because the test doesn’t have an analysis object assigned yet; this gear itself fails to test locally with the python script above!
This is a challenge we are actively working with Flywheel developers to solve. In the mean time, we use the class documentation to guide us. Hopefully, all you’ll need is the analysis ID, which is already documented for you in this tutorial.
Uploading to Flywheel
Once you’ve finished testing, you can upload your gear to Flywheel with fw gear upload (no arguments). Flywheel will package up your gear and ensure the manifest options make sense before uploading it to the GUI, where you can now run your gear!

Gear Maintenance
As with all things in life, it’s easy to obtain, but much more difficult to maintain.
We strongly recommend version controlling your gear’s directory on Github, and committing changes incrementally.
If something changes in your code, you must update the manifest.json file to increment the version. In Flywheel, you can either choose to have your <software_tag:gear_version_tag> identical, e.g. 0.0.1_0.0.1, or to increment your software more frequently than incrementing the gear. E.g., our fMRIPrep gear is on version 0.2.2, but the fMRIPrep algorithm is on version 1.5.2; the benefit of this is that we can make changes to one and not the other.
If you need to debug a gear that failed, locally, you can use docker to spin up a local container of what was running on Flywheel. This guide describes how this is done. In brief:
- Copy down a python script written by Flywheel developers that automates the process of recreating the failed state
- Run the script using your API key and the failed job ID as input; the output will be a bash script that will run docker
- Edit the bash script to use a docker image in which you have implemented your changes.
End
Thank you!
Visit PennLINC.github.io for more documentation.