Project Directory Creation Request
Once you have access to CUBIC, you may need to start a project in a new directory. Review the CUBIC Documentation on Project Research (VPN required; you might need to login first, and click the link again for access) for detailed information.
For instructions on creating a new project, read here.
First you need to fill out the data management document available here. This document will ask you for a number of details about your project, including the data’s source and estimates about how much disk space you will need over a 6 month, 12 month, and 24 month period, and the estimated lifespan of the data ( 🤷). PennLINC is only charged for the amount of disk space actually used on a project, not the amount you request at this stage. It is reasonable to be liberal in your disk space estimate at this stage, as it is a pain to upgrade later. You will also need to provide the CUBIC usernames for everyone you want to have read and/or write access to the project — getting this done ahead of time is strongly recommended because, as you can imagine, requesting changes after-the-fact can be a bother.
Additionally, you will need to be familiar with:
- Whether or not the data has an IRB associated with it and who has approval
- Whether or not the data is the definitive source
- Whether or not you have a data use agreement
- What will happen to the data at the end of its expected lifespan on the cluster
This document must be saved as a .txt file and before being submitted with your request.
Finally, you will need approval from your PI. This involves sending an email to the PI with a written blurb to the effect of “Do you approve of this project folder request”, to which the PI only needs to respond “Yes, approved”. Once you’ve got this you can screenshot the conversation (include the date in frame) and save that as an image.
With these two documents, you can now submit the request via the the CBICA Request Tracker. Similar to the CBICA Wiki, you need to access the Request Tracker through the PennMedicine Remote Access Portal, then click CBICA Request Tracker. You’ll need your CBICA/cubic login credentials for this (same as UPHS credentials)!
![]()
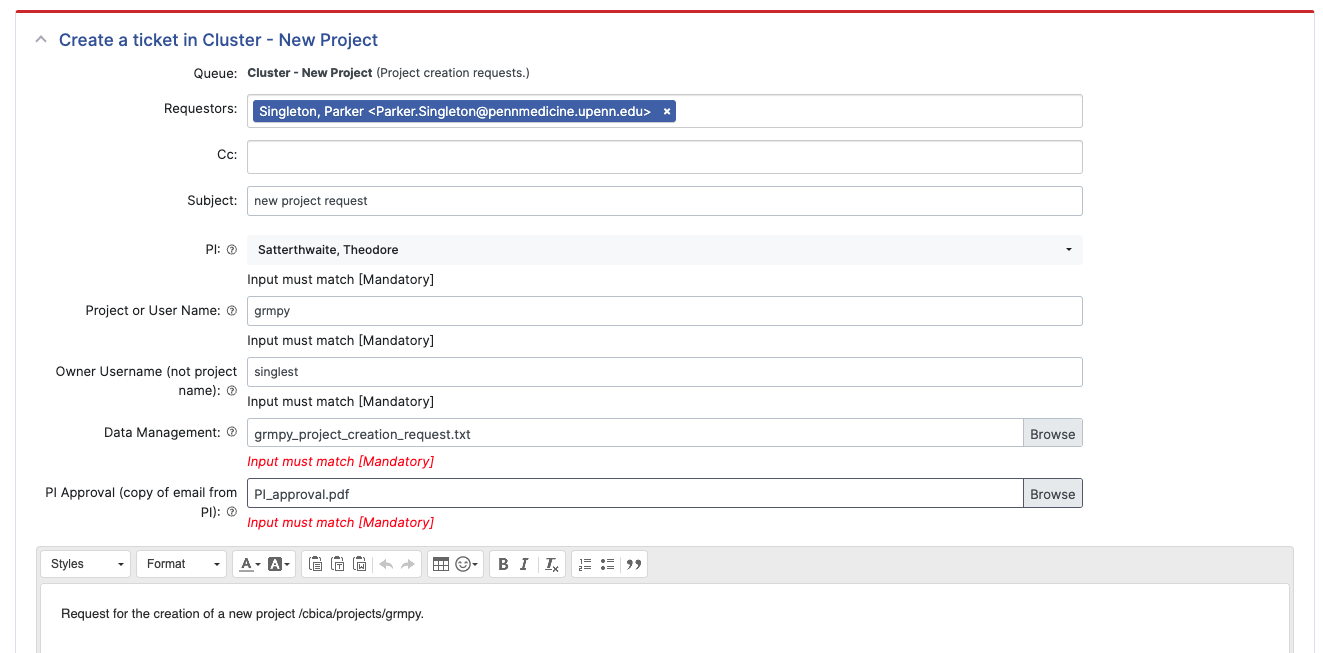
Open a new ticket and, fill out the project or user name (the name of your project dicrectory), your username, select your PI from the dropdown, and upload the plain text version of the project request form under ‘Data Management’, and lastly upload a pdf of your PR’s email approvale of the project creation.
Project Directory Access Request
The process for accessing an existing project is similar, but fortunately you will not have to fill out a new data management document; only the PI approval and filling of the online ticket is required. You should receive an email from CBICA confirming your request, and you can always return to the Request Tracker to see the status of your ticket. See CUBIC instructions on accessing a project here.
File permissions on CUBIC
Unlike many shared computing environments, read and write permissions are not configured using groups. Instead, individual users are granted access to data on a project-by-project basis. For example, if you are a member of the project pnc_fixel_cs you will not be able to read or write directly to that project’s directory (which will be something like /cbica/projects/pnc_fixel_cs).
To access a project’s files you have to log in as a project user. This is done using the sudo command after you have logged in as your individual user. In this example you would need to use sudo to log in as the pncfixelcs user and run a shell. Note that underscores in the project directory are removed when logging in as the project user. By running
$ sudo -u pncfixelcs sudosh
and entering the same UPHS password you used to log in to your individual user account. You can see that the project user has their own environment:
$ echo $HOME
/cbica/projects/pnc_fixel_cs
This means that the user will have their own startup scripts like .bashrc and .bash_profile in their $HOME directory.